Migrating a PDF form to a web-based form is a common task. Most of the configuration of the new form is done in the application and not in the model. The reason for this is to ensure that the administrator of the application has the control to make changes to the forms without the need for further deployments.
Before you start
The first few steps of the migration are enabling the forms in the Diagram editor and deploying the application. Once this is completed, the majority of the work is then done in the application except when custom tiles are required. See the image below for the PDF migration workflow to help visual the process.
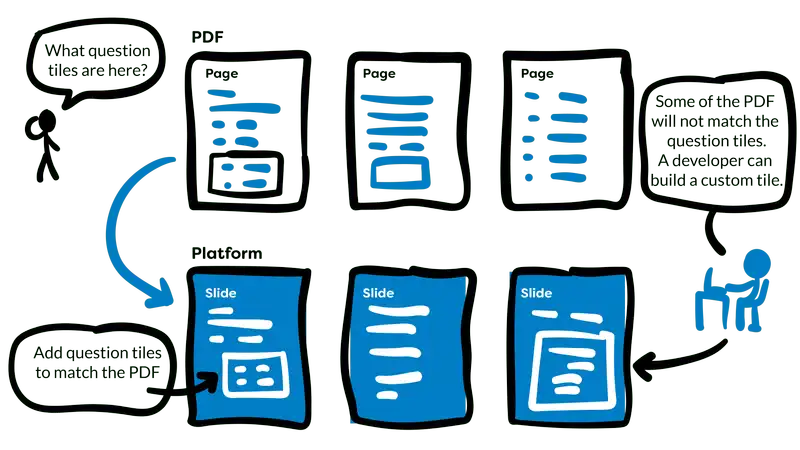
In the justification section, there are more details on how to use the functionality of the forms such as slides, skip logic, show logic, and what tiles are available. There is however an important concept that should be understood. When you are migrating a PDF form and you come across a section where none of the standard tiles match your desired functionality, you will need a custom tile.
All forms in a business follow a different process to ensure that they are handled correctly. In order to ensure form migration is successful, it is important to understand every step a form goes through, from how it is processed, to who is involved, to the different resources that a user may require access to in order to fill it out. If you don’t know all of the details yourself, make sure you have access to someone you can consult with for each form.
Details
Level of difficulty
Moderate
Stage
Migrate
Suggested time
60 mins per PDF form, depending on the size and complexity of the PDF.
Participants
- Product Owner
- Business Analyst
Materials
- The Codebots Platform
- Whiteboard, or printing and post-it notes with lots of wall space.
Steps
There are a number of ways in which you can plan your form. If you want to keep it exactly the same, you could print out the form (or use a PDF editor) and draw squares around every “input” you want to be included. This is essentially any place where you need the user to write in some details or select an option. Later, these will be recreated using question tiles.
If you want to reorganise or reconfigure the form, there are a large variety of options available to you. You could use post-it notes, a whiteboard, or even cut out the questions in the form and use blu-tack. It is important that you work your way through the form, making note of the key sections in the form and write them down with the questions inside. At this point, you can rearrange the sections and questions into whatever order you desire. The sections allow you to keep the related questions all together so the form follows a logical order.
Even if you aren’t reordering your questions or altering the form, it is important that you familiarise yourself with the form itself so you can be confident that what you are building is correct.
- Enable forms in your Entity Diagram, and include form display tiles in the Interface Diagram anywhere you want one of these forms to go (the interface step can be done later, though it will require a re-deploy).
- Deploy your application and open up the administration section. If you added forms successfully, it should now be available as an option in the menu. Navigate to it and create a new form.
- Enter the details of the form, and configure the display settings in a way that suits your application and the requirements of your form. Everything will autosave as you go. In this page, you can also select the location the form is displayed in, according to the locations you specified in step one if you used the Interface Diagram.
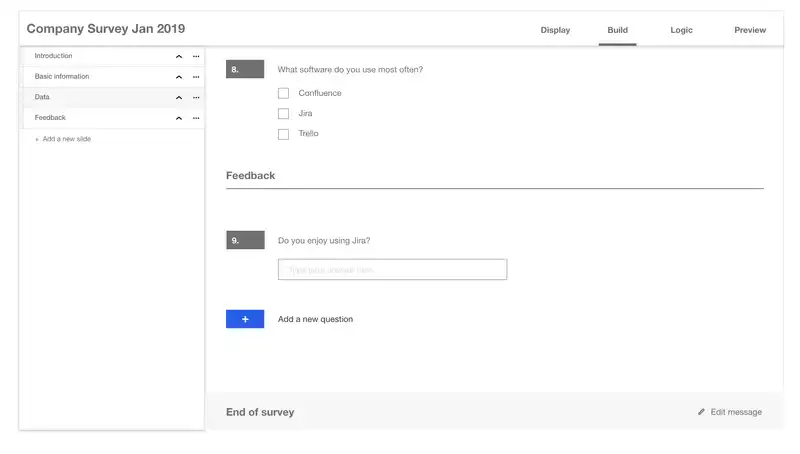
- Go to the build tab of the form builder. From this screen you can add and edit question tiles, control their options, reorder them, and manage your slides. Following your plan, start adding in questions and configuring their validation if necessary.
- Once complete, you can move to the logic tab if necessary, or you can preview the form you have built.
- If you are happy with everything, you can publish your form and it will become available on the frontend of your application, provided you completed the interface part of step one.
- Repeat those steps as necessary until you have completed all of your forms.
Justification
PDF forms can be used in any number of ways within a business. From being used internally to capture reports, to displaying on the company’s website for people to fill out and email back, or printed for customers to fill out and post back to you as snail mail, they have become deeply embedded in the processes of a lot of companies. No matter how they are included in a business process, the use of them requires a whole workflow to fill them out, submit and then process them in the correct way. In a world where customers are used to being able to fill out forms online and have them submit instantly, the process of filling out PDFs becomes an inconvenience they want to avoid. For this reason, it is important that we ease this process as much as possible. By migrating the workflow over to be a web-based system, the users are able to complete the process with more efficiency and the risk of invalid values becomes significantly smaller.
Submissions
Forms can be filled out multiple times by multiple users. Each time a user submits their form, a new submission is saved in the database. All submissions received for a form can be viewed in your application’s backend.
Versions
Versions are in place to allow you to edit and create forms, without users seeing it mid-build. It allows you to control when your latest changes are made available to the public so you can edit a form, save and walk away, without the partially edited version being shown to users until you are ready. This is quite handy if you regularly need to update a form with new questions or standards, or if you want to reconstruct an existing form. Versions are automatically made when you edit a form which has been published, though you control when your new version is published. You can see previous versions of a form from the backend of your application.
Slides
Slides are a way of introducing logical grouping to your questions, and are used to give you control over how your questions are displayed. They can be thought about in a similar way to Powerpoint Slides, in that you use them to display a few pieces of information before moving onto the next one. Using the display options, you can also configure whether they display as seperate “pages”, or if they all show on the same page but with a distinct break between the sections. They can also be helpful when building the logic behind a form as they allow you to skip large sections at once.
Tiles
Tiles are how you add questions into the form. There are a large variety of types available, some of which allow you to switch between the types (i.e. dropdown, checkboxes and radio buttons). You can add, remove and duplicate tiles, in addition to being able reorder them.
Logic
There are two types of logic which are available inside a form: skip or show. The logic is based around how a user answers a given question, and runs the logic when they answer. Skip logic allows you to show a question normally, but hide it occasionally. Show logic means that a question is normally hidden, and is shown only if a question is answered a certain way. You can choose whether the logic is applied to an individual tile or a whole slide. Due to the nature of both kinds of logic, they can be used to recreate the other type (though it can make things complex). It is up to you around how you choose to approach this, though we do recommend thinking about this first before you start making the logic. This should be considered while you are still in the planning stage so you can draw arrows between things and play out some scenarios to make sure you understand everything.
Once your logic is built, you can test it using the preview section of the form builder. The more complicated your logic is, the more important it is that you test it thoroughly. It is possible to make it impossible to finish a form if the logic is incorrect. For that reason, the preview tab does have a reset button in case you get stuck, which takes you back to the start of the form.

Written by Tessa Mylonas
Head of Support and Education
If Tessa isn’t busy answering support questions or educating you about the Codebots products, she is typically found putting together flat-pack furniture, playing with her chocolate Labradors or hoarding houseplants.